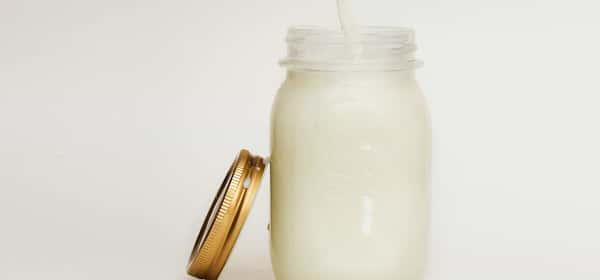
Making kefir at home sounds like an intimidating fermentation project, but it might be the single easiest “from scratch” food there is: you put grains in milk, wait a day, and strain. That’s genuinely most of it. And the payoff is real — homemade kefir is cheaper than store-bought, more probiotically diverse, and endlessly repeatable once you have your grains. If you’ve been buying pricey bottles, here’s how to make your own tangy, fizzy, gut-friendly kefir in a few simple steps.
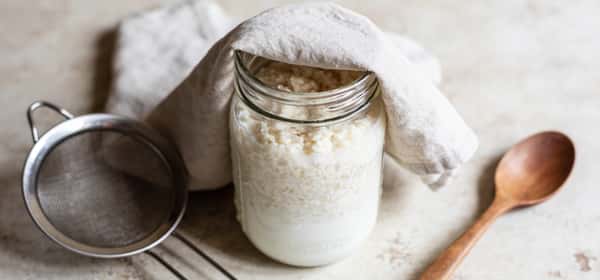
Quick answer: To make milk kefir, add about 1–2 tablespoons of milk kefir grains to 2–4 cups of milk in a glass jar, cover it loosely (not airtight), and leave it at room temperature for about 24 hours. When it’s thickened and tangy, strain out the grains with a non-metal strainer, and your kefir is ready — refrigerate and drink it. Reuse the same grains for the next batch. It’s cheap, low-effort, and yields a more diverse probiotic drink than most commercial versions. For the cultures that make it work, see kefir grains.
What you’ll need
The equipment list is refreshingly short and low-tech:
A calm gut starts with the right meals. Choose your goal and get your plan.
Powered by DietGenie Eat healthy
 Lose weight
 Gain muscles
 Explore new cuisines
- Milk kefir grains — the living culture. Get them from a friend who makes kefir or buy live grains online. See where to get them.
- Milk — cow, goat, or sheep milk (whole milk gives the creamiest result). Around 2–4 cups per 1–2 tablespoons of grains.
- A glass jar — a clean mason jar or similar.
- A non-metal strainer — plastic or nylon mesh; avoid prolonged metal contact with the grains.
- A breathable cover — a cloth and rubber band, or a loosely placed lid.
- A non-metal spoon — for stirring and scooping the grains.
That’s it. No special equipment, heat, or starter powders needed.
Step-by-step method
- Add the grains to milk. Place about 1–2 tablespoons of kefir grains in your jar and pour in 2–4 cups of milk. A rough ratio is 1 tablespoon of grains per 1–2 cups of milk — more grains ferment faster.
- Cover loosely. Put a cloth or loose lid over the jar. Don’t seal it airtight — the yeasts release a little carbon dioxide, and it needs to escape.1
- Ferment at room temperature. Leave the jar on the counter, out of direct sunlight, for about 24 hours. Warmer rooms ferment faster; cooler rooms slower.
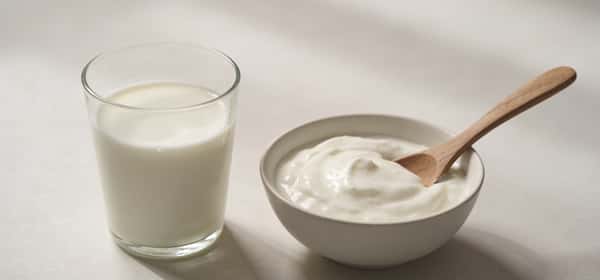
- Check it. The kefir is ready when it’s thickened, tangy, and slightly fizzy, and may have started to separate into curds and whey. If it’s still thin and milky, give it more time; if it’s very separated and sour, it fermented longer than needed (still fine, just tangier).
- Strain out the grains. Pour the kefir through your non-metal strainer into another container, gently stirring to help it pass. The grains stay behind in the strainer.
- Start the next batch. Put the strained grains straight into fresh milk to begin fermenting again — they’re reusable indefinitely.
- Refrigerate and enjoy. Your finished kefir goes in the fridge. Drink it plain, blend into smoothies, or use it like buttermilk.
Getting the fermentation right
The main variable is time and temperature, and you adjust to taste:
- Shorter ferment (12–18 hours) → milder, thinner, less sour kefir.
- Longer ferment (24–36 hours) → thicker, tangier, more sour, more separated.
- Warm kitchen → speeds it up; cool kitchen → slows it down.
Taste as you go and you’ll quickly learn your preferred timing. If it separates into curds and whey, that’s not spoilage — just over-fermentation; stir it back together or strain and shake.
A second ferment (optional)
For extra flavor and fizz, try a second fermentation: after straining out the grains, seal the finished kefir in a bottle with a little fruit (or a slice of lemon) and leave it at room temperature for another 12–24 hours, then refrigerate. This mellows the tang, adds natural fizz, and lets you flavor it without added sugar. It’s optional, but it makes kefir more soda-like and palatable for beginners.
Common issues and fixes
- Kefir won’t thicken: grains may need time to adjust (new grains can take a few batches), the room may be too cold, or you may need more grains relative to milk.
- Too sour: you’re fermenting too long — strain earlier next time.
- Grains not growing: ensure fresh milk each batch, avoid metal, and don’t rinse in chlorinated water.
- Off/rotten smell (not just sour): discard if it smells genuinely putrid or looks moldy — proper kefir smells tangy and yeasty, not rotten.
Homemade kefir is quite forgiving, and small variations are normal.
Why bother making your own?
A few genuine advantages over store-bought:
- Cheaper. After the one-time cost of grains, you only pay for milk — a fraction of bottled kefir’s price.
- More diverse probiotics. Homemade and artisanal kefir tends to have a richer microbial community than standardized commercial versions.2
- No additives or added sugar. You control exactly what’s in it.
- Endless supply. The grains multiply, so you’re set for life (and can share).
For the gut-health payoff, see kefir for gut health.
Storing your grains and taking breaks
Life happens, and you won’t always want to ferment a batch every day. To pause, put your grains in a jar of fresh milk and store them in the fridge — the cold slows the microbes right down, and they’ll keep for a couple of weeks (change the milk every week or two for longer breaks). When you’re ready to start again, bring them back to room temperature; the first batch or two after a rest may be a little slow or off-flavored before they hit their stride again. For longer storage, grains can be dried or frozen, though reviving them takes more patience. This flexibility is part of what makes kefir so practical — it fits around your schedule rather than demanding you fit around it.
Suggested read: Kefir Grains: What They Are and How They Work
The bottom line
Making kefir at home is about as easy as fermentation gets: combine milk kefir grains with milk in a glass jar, cover loosely, leave it at room temperature for around a day, then strain out the grains and refrigerate. Reuse the grains forever, and adjust the fermentation time to dial in your preferred thickness and tang. An optional second ferment adds fizz and flavor without sugar.
The rewards are real — homemade kefir is cheaper, additive-free, and more probiotically diverse than most bottled versions, all for a couple of minutes of effort a day. Once you’ve got a healthy set of kefir grains, you have a renewable supply of tangy, gut-friendly kefir on tap. For everything it does for you, see our kefir benefits guide.
Farag MA, Jomaa SA, El-Wahed AA, El-Seedi HR. The Many Faces of Kefir Fermented Dairy Products: Quality Characteristics, Flavour Chemistry, Nutritional Value, Health Benefits, and Safety. Nutrients. 2020;12(2):346. PubMed ↩︎
Vieira CP, Rosario AILS, Lelis CA, et al. Bioactive Compounds from Kefir and Their Potential Benefits on Health: A Systematic Review and Meta-Analysis. Oxid Med Cell Longev. 2021;2021:9081738. PubMed ↩︎